Beyond the Last Touch

Our perch in the trees overlooking our neighborhood

One should never title a blog entry as “The Last Remark”, just as there should never be a textbook titled “Modern Principles of …”  There’s always new stuff that comes along.

In the ever-ongoing renovation of This Odd House, we came to consider how much we enjoyed our second-floor screen porch, a retreat in the treetops from which we observe the sidewalk-level activities of our neighborhood.  The porch needed help—the screens were aging, failing to keep out insects and critters.  It was also pervious to snow and rain, which then seeped into the floors and walls, with predictable results.

We decided to install wall-height replacement screens that convert into a vinyl window.  In the summer they will be three-fourths open screen, in the winter they can be closed against the snow.  I remain skeptical that clear vinyl (yes, the same soft vinyl used in swimming pool toys), will stand up against ultraviolet and Minnesota temperature swings, but I am conducting the experiment.  There seem to be many satisfied customers; I hope to be one of them.

I thought it would be straightforward to create the rough openings for the new windows.  Of course, in This Odd House, there is no such thing as “straightforward”, just as there are no square corners or level floors.  Unconventional construction methods had been used to build this outdoor space, and we discovered an odd assortment of studs and spacers behind the wood-paneled walls.  Posts we thought were weight-bearing turned out to be weight-loading.  Beams that would normally be supporting a load, were loads themselves and needed their own support.  It reminded me of the treehouse I built when I was twelve.

Eventually, we were able to sort out the structural elements and get the window openings prepared.  We had ordered the windows months earlier, but during the pandemic, business for home improvements was booming, and the windows would not arrive until December.  Fortunately, the winter weather was mild, and the installation went well.

Although the windows were now installed, the space was not heated, and winter is the season not included in the term “three-season porch”.  Still, I found that this space provided the perfect wind-protected studio to take pictures of freezing soap bubbles!

Now the weather is warming, and there are some more things to finish, including the replacement of the worn and stained plastic carpet.  My plans are to tile the floor with Penrose tiles, a topic I will take up next.

Posted in Uncategorized | 1 Comment

The last touch.

bedroom-1532

A view of the Lally column holding up the sagging ceiling, a ceiling textured and patched to camouflage whatever happened before.  The walls are also textured, in their own way for their own purpose.


The major changes to This Odd House happened in 2012-2013, and there have been subsequent enhancement projects (stairway, garage, solar panels), but the transition from “remodeling” to “maintenance” has long since occurred.

Yet there was one remaining area of the house that had been neglected, namely our bedroom/bathroom. After dealing with some critical plumbing issues at the very beginning, and finally giving up on one of them (the unusable shower was converted to a cedar closet), we had pretty much accepted the room as is.

This is much credit to Portia’s tolerance for suboptimal living conditions. I was always surprised at her acceptance of the lack of closet space and the obvious wear and tear that had taken its toll on what at one time must have been a glorious focus for the previous owners’ lifestyle. Yes, I know, gold plated fixtures and lighting, Jacuzzis with “Rainbow” faucets, and expansive mirrors are not everyone’s design choice. But in her appreciative and loving tone she would always reassure me: “It doesn’t matter”. She was in it for the ride and journey, fully committed to this new life; tasteful surroundings were not required.

We made accommodations by commandeering the closet belonging to a different room that had the misfortune of being too proximate. It now has closet doors on both sides. And we placed art on the walls that were a comfort to contemplate every morning as the room gradually lit up with sunlight. We tore up the water-stained carpet that had been in the bathroom (who puts carpet in a bathroom?). We placed a synthetic fiber rug over the exposed plywood subfloor.

But eventually, the remaining bedroom carpet needed to be replaced. It had been stained by water and other fluids over the years and we decided that this was an opportunity to put some nicer flooring in place. We thought that large ceramic tiles with winter-scheduled underfloor heating would be a big improvement.

There is a phenomenon in project planning called “scope creep”. Once you start, there are opportunities previously unavailable. In our case, once you have moved all the furnishings out of the room to tear up the old carpet, it is just too easy to consider what other things could be done while the room is empty.

Obviously painting the walls would benefit from having an open room. But our walls were a mess, a heavily textured surface, probably to hide earlier sins, and scarred by patches from a history of upstairs plumbing failures. I wanted the ceiling to be smoothed, but the walls cried out for it too.

Further, the previous owners’ remodeling had removed a large section of a structural support wall, and the open ceiling had sagged over the years, creating a gyre for marbles and other loose items on the upstairs floor above it. I had tried to stem the gradual strain due to gravity with a “Lally column”, but this is always a temporary fix. Here was an opportunity to replace it with a proper support.

While I might have considered taking on some of these tasks, I recognize the limits of my skills. Many of these tasks were beyond me, and if I took them on, it would entail a lengthy learning curve.   In some situations this would be ok (it took me almost a year to finish the cedar closet), but we would be “camping” in our alternate bedroom space- the front project room/studio, and didn’t want to spend the next year answering the doorbell and explaining why our bed was right there.

So we hired a skilled contractor who specialized in making smooth walls out of rough ones, and had other talents as well, in particular the installation of ceramic tiles. As usual, the job took longer than expected, but with a time and materials arrangement, no one feels bad about the surprises that come up and need to be solved. The pressure to meet a contract bid is gone, and we can decide on the best way forward. Any unexpected work that comes up is work that had to be done, eventually if not now. After years of such surprises in This Odd House whenever a wall or floor is opened up, I have come to prefer this as the way to handle it.

In our case, the walls and ceiling had suffered water damage from long slow leaks from the upstairs bathroom and kitchen. Sections of the walls were rotted and mold had formed. Replacement sheetrock solved it.

The floor too had suffered water damage. Beneath the carpet was a layer of decayed subfloor. We thought that we could simply put the new flooring on whatever was beneath the carpet, but in the end, the ¾” particle board had to be removed. Under it was a layer of linoleum tiles, and under that the original wood floor, but it too was in terrible shape. In some cases it had rotted completely away, giving us an unwanted open view of the basement.

The installer discovered that the floor was not level, no surprise there. Fortunately, when laying large tiles, it is not mandatory that the floor be level, just flat. Of course that wasn’t true either, especially with the heating cables running over some areas but not others. He told me that record amounts of mortar were required to make it all work.

In the end, the tile floor was beautiful, the walls were smooth and freshly painted, and before moving back in I took a few photos. Here they are along with some photos before and during the renovation.


bedroom-5715

The finished bedroom with new tile floor, smoothed walls and ceiling, ready for moving back in!


Posted in Uncategorized | Leave a comment

Shower to closet conversion

cedarClosetAfter

I’m declaring completion on a modest revision to our floor plan, the conversion of an unused shower stall into a cedar closet. It has been over seven months since starting the project, and it would be entirely reasonable to ask how it could possibly take so long.

Well, apart from my excuses of being a novice, and only dedicating available weekends to the effort, there were other factors. In particular, This Odd House presented some unique challenges. I will try to list them without belaboring them.

The shower was off the master bedroom. It had been carved out of space that was originally a stairwell, a narrow area about 3-feet wide. It was deep, over eight feet, with the shower head at the far end. The former remodelers were fond of low ceilings and dropped it down to a little over six feet, for that cozy shower feeling I guess.

I had attempted earlier to repair and update the shower head and faucets, but it was still an awkward situation. To take a shower meant entering the stall and traveling to the far wall to turn on the faucets. It was impossible to do this without being in the initial blast of cold water. There were other showering options available in the house that didn’t involve a full body check of the water temperature, and so this facility fell out of favor. Eventually, the abandoned space started to be used for other purposes, like temporarily storing things. It eventually became the established storage location for things, a closet, if you will.

Meanwhile, we had noticed that some of our favorite, if not fashionable, woolen attire tended to olfactorily pre-announce themselves when we wore them in public gatherings. The mothball protection of their seasonal storage extended well beyond their storage and into the active social season. Our sartorial choices were being compromised.

A plan was made. We would convert the shower space into a cedar-lined closet, the cedar aromatics being effective against moth larvae without the naphthalene aftertaste. An access door would be made through an outer wall so one did not need to enter and exit through the bathroom. Residual space would be used for shelves to hold linens. It seemed straightforward.

It wasn’t. Here are the things I encountered while making this closet conversion.

  1. The dropped ceiling. Above it was a dead space that had accumulated the construction debris of not just the original remodeling of years ago, but mine too! (from the kitchen renovation one floor up). Wood lathe and plaster, insulation, old ceiling tiles, abandoned wire and plumbing parts, it was all conveniently swept into this dark pit from above.
  2. Removing the shower stall itself was relatively easy. Plastic and fiberglass and sheetrock. Removing the plywood ceiling involved “disassembling” it by cutting it into sections with a sawzall, avoiding the plumbing and wiring that was routed directly across it. I wasn’t fully successful, cutting through a support that had electrical lines running through its core (who would fabricate a hollow beam and run power through it?) It resulted in arcs and blown fuses that took days to figure out and repair.
  1. The new closet door. It could have been simply an opening in the wall, but because the wall was originally part of a stairwell, it was load-bearing. I couldn’t just cut out the studs, I had to add studs and a header to redistribute the load.
  2. At the location of the closet door, between the studs to be removed, there was a large electrical junction box, perhaps 15” square. It seemed to be a major distribution center for the power in the bedroom and bath. I had to relocate it.
  3. The plumbing to the shower was, how do I say it, convoluted? In the end, I had to call a professional plumber to remove it without impacting the water flow to the rest of the house. We also discovered the water line to the outdoor faucet had no shutoff valve and was exposed to winter temperatures. The plumber’s comment to all this: “I’ve seen stupider”.

Of course some of my problems were self-inflicted. The new closet door was on a wall in our bedroom, a room with 10-foot ceilings. We had carefully mounted a mirror salvaged from another odd bathroom in the house (that got downsized), onto this wall. With no other place for the mirror, the plan was to put it on the door to the new closet.

It was a 9-foot mirror. It needed a 9-foot door. Perhaps there are places to shop where doors of this size are available, but I was unable to find any. So I set about to commission a custom door. I found several sites online that offered custom doors, but every time I tried to order one, I found that this dimension exceeded their abilities. The local Home Depot would make a custom door, but only to 8-feet. I had to build my own.

In the end, I ordered an 8-foot door and then “spliced” a 6-inch header and footer to each end. After sanding and painting, it looks almost seamless. And the mirror covers the seams anyway.

This was supposed to be a winter project. I started on New Years Day. Now, finally, in August, I can declare completion (with some provisos, there is always a punch list).

My wool sweaters are now stored in a protective but not toxic environment and I look forward to wearing them with confidence next winter!

cedarClosetBeforeBEFORE.  The opening for the new closet door revealed a load-bearing wall and an electrical junction box.


cedarCloset_IMG_1799I’m not sure this is up to code.


cedarCloset_IMG_1822A hint of the plumbing and wiring labyrinth that had to be cleared.


cedarClosetDoorA selfie in the nine-foot mirror mounted on the closet door!

Posted in Uncategorized | Leave a comment

To Laugh Often…

I wrote this over a year ago and recently discovered that I never published it.  In a moment of reflective appreciation I tried to capture the sentiments of an anniversary.  Although late, it still holds today as it did then:

PoldiGoingToTheSun2

To laugh often…

It has been a year since the collective sigh of relief at Portia’s pathology report. It has been a remarkable year, an unexpected high point in our lives. Who would guess that at our particular age we would have the experience of a renewed life and love while renovating a home for it to thrive within?

We are still crazy-in-love, a completely unexpected experience; one might think the passion would die down, but it carries on. We can only wish it for everyone; we urged all at our commitment ceremony to renew it with the one they share their lives with. Time is short.

We are learning that the risks of life build up, eventually to certainty, and many of our elders and now some of our cohorts have encountered their ends. It is sad for us remaining. I like to envision my friends and relations at the prime of their life, at the height of their interactions with the people close to them. Photographs, memorabilia and old letters provide time-travel to a moment that represents their peak vitality, a moment we would all like to think of ourselves at; an identity marker.

We pass through this life in our unique ways, and the measure of it is our impact on each other. I recently encountered an expression of this that I had forgotten. Before I forget it again:

“To laugh often and love much; to win the respect of intelligent people and the affection of children; to earn the appreciation of honest critics and endure the betrayal of false friends; to appreciate beauty; to find the best in others; to leave the world a bit better; to know even one life has breathed easier because you have lived. This is to have succeeded.”

(Attributed to) Ralph Waldo Emerson

Posted in Uncategorized | 2 Comments

Stairway Lighting

Stairway-1

I have written previously about the “runway lights” that graced the main stairway and provided a whimsical (if not outright comical) accent. Someone had taken the trouble to install and route the wiring to a series of colored lamps along the skirts of the stairway. I considered this to be one of those features that attracted me to This Odd House and I wanted to preserve it in some way.

The installation of the new treads and risers had required temporary removal of the runway lights in order to cut and fit the new pieces. Now that the stairs were (mostly) in place, I needed to restore the lighting. As usual, the inexpensive and easy solution, re-installing the Edison sockets and utilizing my renewed supply of specialty incandescent lamps, was rejected in favor of the modern way to do lighting: LEDs!

LED lighting has so many advantages over traditional lighting that it is just easier to list its only disadvantage: price. So in a project where the bulk costs of the major raw material (hardwood maple), far exceeds this one factor, it is easy to justify almost any LED lighting design.

I wanted to retain the “feel” of runway lights highlighting one’s traversal of the stairs, and to simultaneously convey the visual pleasure of color.  I could replace the individual colored lamps with equivalent LED bulbs, but I also considered LED strip lighting that would run a continuous path along the stairway. Once I found a “J-channel” molding that could house such a strip, the choice was obvious. I proceeded to design an LED replacement for the runway lights.

This choice brought new requirements however. I needed a power supply for LEDs: 12 volts DC, not 120 volts AC. If I wanted color, I needed the RGB strip, not the white strip. If I wanted to control the color, I needed an LED color controller module.

The requirements went on, but at this point I was committed. In the end, I was able to install the necessary power supplies and control components under one of the stairway treads. Motion sensors are positioned so that as you enter the stairway from either the top or bottom landings, the power switches to the LED strip lights, and you experience the personal attention of a light-guided path to the next level.

I still had the issue of what to do with the empty holes that had held the previous Edison lamps. I was about to cover them with blank coverplates, but Portia discovered that there are modern LED nightlights that had the exact same diameter. She brought some home from IKEA and I adapted them to their new role. The stairway is now lit with the calm glow of these lights until someone actively ascends or descends, at which time the new LED runway lights come to life to light the way.

Here are some recordings of the up and down experience:

Posted in Uncategorized | 2 Comments

The Sawmill

The original stairway landing of black and white vinyl tiles.

The original stairway landing of black and white vinyl tiles.

With the treads and risers shaped and mostly installed, I turned to the landing, that platform at the top of the twelve main steps, which with a 90 degree turn, presented the remaining five steps to the second floor living quarters.

The landing was the last vestige of the black and white checkerboard theme that dominated this floor. I had a mild reluctance to remove it. Somehow it seemed to fit with the other quirky attributes of This Odd House, especially the disco ball, and the “runway lights”, but the time had come to modernize them. I had a vision that would do so, and still retain some of the character.

Under the black and white vinyl tiles was a subfloor panel, and under that was the original flooring, maple that had been stained, tortured, painted, and abandoned. I considered renovating it by sanding it down and refinishing. It might match the upstairs wood flooring. But then after such heroic resuscitation, it might look something entirely different.

I looked at the new treads and risers that I had installed, and realizing that I had an accidental excess supply of the very same wood sitting in my garage, decided that I could replace the wood on this landing with the same hard maple that the rest of the stairs were built from.

It sounded right to me. The stairway would become a single integrated experience. There was one problem. Wood flooring is usually installed as 2-1/2” tongue and groove, and to keep the architectural style, this needed to be honored. My wood stock was 7-1/2” wide. This would just not look right if it were installed as is.

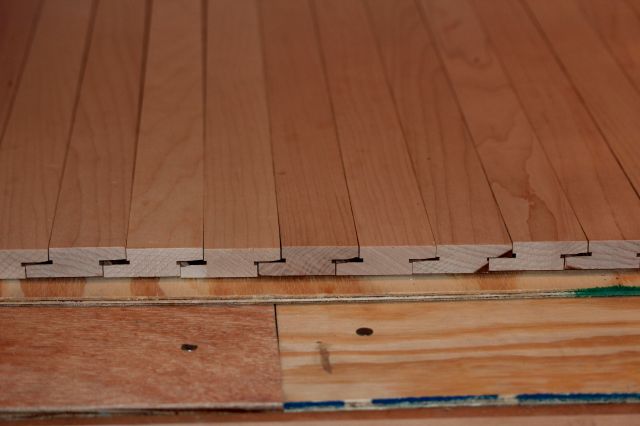
So I resolved to cut my boards into strips. I did not have the capability to make real tongue and groove edges, but perhaps I could make overlapping joints and count on the stiffness of the wood to keep its form.

Each 7-1/2” board could be cut into three (almost) 2-1/2” strips. Each of those could be cut so that it would overlap with its neighbor by ½”. It would take 14 precision cuts per board. I needed to chop up eight such boards, so I would be putting the table saw to extensive use for this hundred-plus cuts.

Once again, I went into “production mode”. Cutting the strips, then cutting the overlap notches was a process that consumed an entire afternoon. I regarded it as utilizing the shop as a sawmill.

When I was done, I laid out the wood strips on the landing, overlapping them by the exact amount, and was pleased that this would actually work!


Wood strips cut to width and with first cuts for the overlapping scheme to substitute for tongue and groove.

Wood strips cut to width and with first cuts for the overlapping scheme to substitute for tongue and groove.

Floor boards, cut and ready for installation.

Floor boards, cut and ready for installation.

The floor boards, fitted and screwed into place.  Almost as good as the real thing!

The floor boards, fitted and screwed into place. Almost as good as the real thing!

Posted in Uncategorized | 1 Comment

The Stair Factory

The main stairway, with eight of the twelve steps temporarily placed.  The light on the wall is the sun shining through a stained glass feature above the entry door.

The main stairway, with eight of the twelve treads temporarily placed. The light on the wall is from the sun shining through a stained glass feature above the entry door.

The right materials arrived in another week, and I no longer had any obstacle or excuse for completing the stair steps. “Factory” is far too strong a description, but having a procedure for making multiple copies of treads and risers for the staircase brought the project into a new phase. I was no longer figuring out how to do it, solving puzzles and learning new tools and techniques. I was applying what I had learned to each piece of wood and fabricating each component to spec.

This was a little unusual for me. To be applying a recipe over and over is not my normal activity. After a career in technology where every day brings a new problem to solve, repeating a process twelve times over seemed like lack of progress. But that is probably just an idiosyncrasy of being in a research and development environment. I’m guessing the guys over in manufacturing get thrills when they can use the same process to stamp out a million identical parts!

Apart from this frivolous viewpoint of mine, there was a larger concern. If the process became too automatic, too mechanical, too routine to keep my focus, my inattention would become a risk with the power tools I was using. I have a friend who is my shining role model for workshop safety, that recently suffered a serious accident. This was at the forefront of my mind as I embarked on this next work.

To mitigate the risk, I decided to run the factory for three separate “production runs” of four stair steps each. The smaller batch size kept me switching between tools and I would not become inured to any one of them.

It was not the most efficient of course. My first four steps took two months to figure out and install. The next twelve took two weeks. I’m sure a professional could do this all in a day. But that’s not the point. I’m not doing this to prove anything. I’m doing it to create something cool and learn some skills in the process.


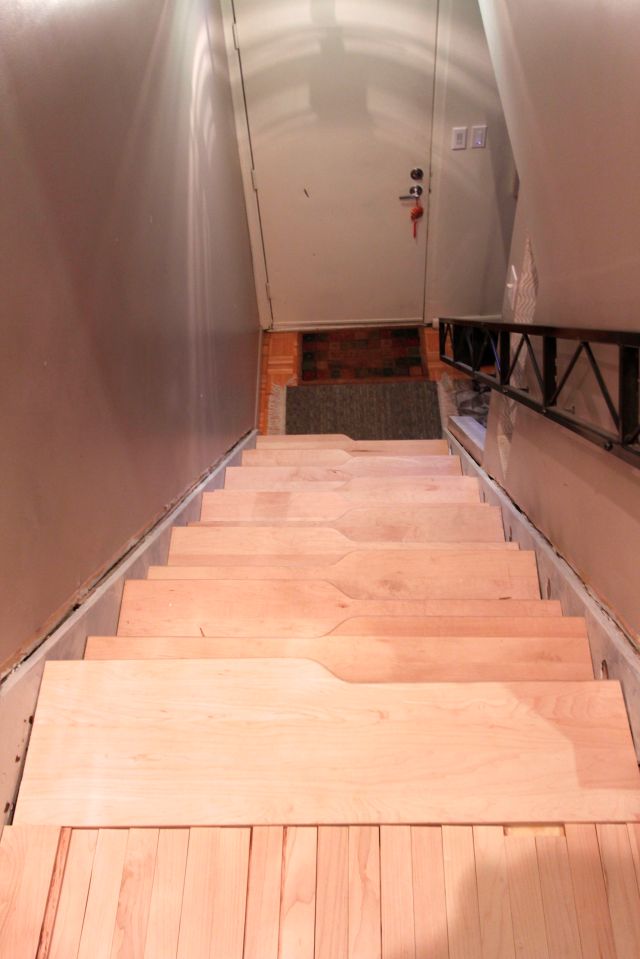
A view down the stairway with the straight treads in place, prior to being shaped.

A view down the stairway with the straight treads in place, prior to being shaped.

After the treads have been shaped for easy descent.

After the treads have been shaped for easy descent.

Posted in Uncategorized | 1 Comment

Measure Twice

Cut once. I need to make a variation on this aphorism. “Measure everything, order once.”

I had completed my mini-stairway, the training set of four steps at the upper section of This Odd Staircase. I had learned how to cut the treads and risers to fit the odd angles, to shape them to my custom design and to install them. I had great satisfaction that the concept would work, and I had a recipe for making the remaining dozen steps.

The upper stair section had treads and risers that were 35 inches wide, give or take half an inch. I had measured them carefully. I measured them more than twice. I had counted the all the steps. More than twice. I added an extra tread and riser, and making a last reconfirming check on the width, ordered the 36-inch stock material from Baird Brothers.

So you can imagine the sinking sensation when setting about to make the first of twelve steps on the main stair section, at finding that they were 39 inches wide, not 35!

And this is why the shipping weight was less than it should have been. If I had been thorough in my measurements, I would have ordered the right materials, coming to 425 pounds of wood, not 380.

I soon started pondering how to salvage this expensive error. Maybe I could add some decorative side elements to hide the fact that the treads were inadequate. A stair skirt of some sort. But realizing this would only complicate a project already over my head, and with some calming encouragement from Portia, I knew what needed to be done. Order the right stuff.

I will figure out how to return the wrong stuff (shipping expense makes this a problem), or find a local market for it, or some other use for it (I proposed making a high class stairway to the basement, but this was rejected).

It was a setback, expensive but not fatal. As Fred Brooks warned me: plan to throw away your first effort, you will know what to do on the second.


Posted in Uncategorized | Leave a comment

The Learning Curve

As mentioned, one becomes skilled by making mistakes. I recall advising my son that to become skilled at skiing (windsurfing, skate-boarding, roller-blading, break-dancing, whatever the current sport), one must fall a hundred times.

I wasn’t really eager to make that many mistakes in my foray into woodworking. Fortunately, today, the internet provides a way to learn just about everything about anything. You-Tube in particular has an overabundance of tutorial videos on any tool, any technique, any material you might have an interest in. Unfortunately, nearly all of them are awful. Maybe it is my background in photography and exposure to the motion picture industry, but I find most of the amateur how-to videos to have bad light, bad sound, bad camera work, and bad scripting. I would be happier to simply read the transcript and bypass the miserable minutes watching a home video by someone who, I am sure knows what he is talking about, but just can’t portray it on camera. It generates an appreciation for professional teachers. I have heard it said “those who can’t do, teach”, but the converse may also be true.

With the internet as a resource, and querying my woodworker friends, I learned a number of interesting things (at least to me):

  • Make a template of the stair tread shape from hardboard; the router bit has a ball bearing guide that can follow it perfectly.
  • Double-sided masking tape adheres the template to the wood. Masking tape comes double sided, who knew?
  • Use a router bit with a 3/8” shank for stability and safety. This caused me to buy a new router that could accommodate that size.
  • One of the most useful tools for cutting each tread to its unique place was a digital protractor. Measure the angle, set the miter saw to that number, and cut! (But get the direction right). A friend of mine acquired a “Stair Wizard”, but this was more expense than I was willing to go for.
  • Hard maple is hard! To screw (or even nail) requires a pilot hole, or the screw may split the wood. For this purpose there are “tapered drill bits” which provide a guide hole that accepts the screw, and even makes a countersink for it.
  • Don’t make a perfect fit. Wood expands and contracts. Allow some breathing room. Here was a license for tolerating cutting errors!

I acquired these lessons as I worked on the small upper stair section involving four steps. I created a design that utilized “floating” treads (not anchored by glue or fasteners). I made a shallow notch (a rabbet cut) into the bottom of the next higher riser that was exactly the thickness of the tread. The tread would fit into that slot and then rest on the stringer. Remember, I am making the treads with an exaggerated overhang over its next lower riser, and I didn’t want the tread to flip up when it was stepped on. The rabbet notch prevented it.

But the tread also needed to be stable front to back. To this end I decided that it could be secured by “pins” to the next lower riser. I found out that ¼” dowel pins are commonly used in cabinetry woodworking. I acquired some, and a tool to help me drill the holes into the matching wood pieces.

There is a challenge to making pinned joints. I can drill a hole and place a pin on one part; how do you know where to drill the receiving hole on the other? My natural inclination is to try and measure with extreme accuracy. But I have been consistently disappointed with this approach. The tools, tolerances and material characteristics just don’t seem to support this technique.

But I recalled a past experience where I had recruited some friends to help me with installing sheet rock. One of them, Dave, was quite experienced (I knew this of course when I invited him), and when we needed to cut holes to match the electrical outlets, I started to make my precision measurements from the edge and bottom. Dave politely offered an alternative, and pulled out from his pocket a tube of lipstick, which he liberally applied to the edges of the outlet box. We then pressed the sheet of drywall momentarily into position, and then dropped it back down to find the exact location of the outlet marked in Passion Pink on the backside of the panel.

I applied that lesson to locate the matching holes for the tread pins.

You may be able to see the hole in the bottom side of the tread that will mate with the pin sticking up from the riser on which it rests.

You may be able to see the hole in the bottom side of the tread (lifted slightly up) that will mate with the (lipstick tinted) pin sticking up from the riser on which it rests.

Over a two month period I was finally able to replace four of the old treads and risers and see if the concept would actually work. It did!

The top four steps from the landing to the second floor were the training ground where I learned the methods for making and installing custom treads and risers.

The top four steps from the landing to the second floor were the training ground where I learned the methods for making and installing custom treads and risers.

There was however, an unanticipated side effect. Making carefully planned cuts in wood works well on paper, but the material and tools are not conducive to this level of precision, at least not at my skill level. The stairs worked, but they were noisy! The small tolerances needed to fit into rabbet notches and alignment pins resulted in a “clattering” sound when traversing the steps. Wood upon wood, at 200 lb impulse loading.

I don’t know anyone who considers the use of shims to be a point of pride. Most of us think of them as the solution to something defective, like that wobbling table at the cheap restaurant that needs a matchbook wedged beneath its foot. I’ve even heard of the concept of “software shims” to try and make one piece of computer code properly connect with another. It was discussed with a distinct disdain.

But sometimes this is just exactly the right solution. And I think this is one of those times. I saw an abundance of wooden shims underlying the old staircase, between stringers, treads, risers, and flooring. I will now apply a new type of shim, a thin rubber tape to cushion the impact of the tread against riser and make every step a firm and silent experience.

I happened to have a surplus roll of EPDM rubber tape from the roofing replacement. It was 1/16” and had adhesive backing. I cut it into 1” strips and applied to each tread, carefully noting the high and low points of the fit and applying the rubber where it was needed.

Some steps were a bit fussy, but that is the character of This Odd House.

Posted in Uncategorized | Leave a comment

First Cuts

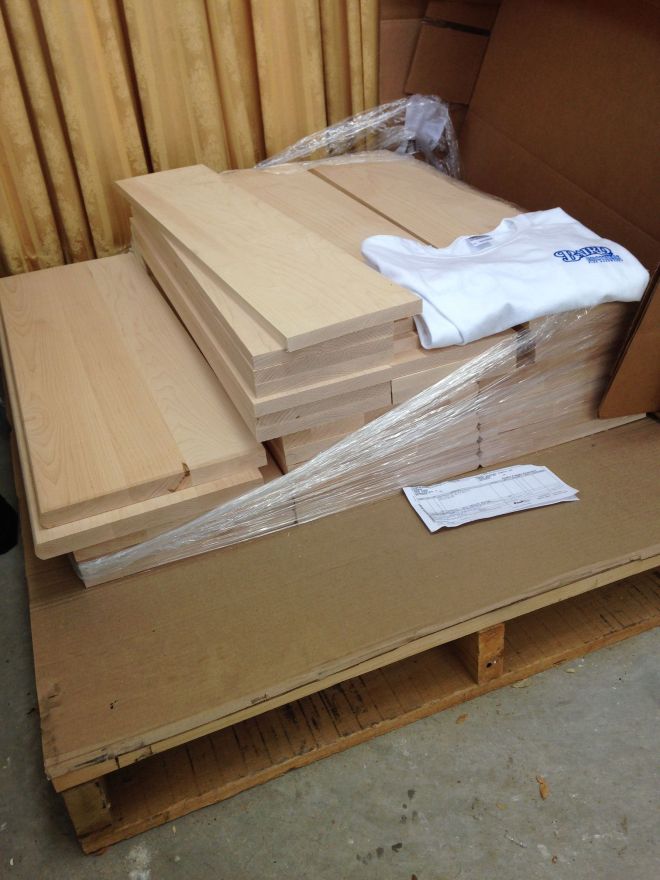
A palette with nearly 400 pounds of hard maple treads and risers delivered to my garage-workshop, complete with Baird Brothers t-shirt!

A palette with nearly 400 pounds of hard maple treads and risers delivered to my garage-workshop, complete with Baird Brothers t-shirt!

Reading a book about how to make something is not the same as actually making it. But this is where I was. I knew at some level how to make stairs, and I had acquired the tools to do so, but had zero experience in using them.  This is a new area for me. At a younger age I would have dived in without hesitation, making mistakes and after-the-fact, figuring out how to correct them. At this point in my life I dive in, but tepidly, knowing that mistakes will happen, and wanting to minimize their impact.

I had ordered, at considerable expense, maple hardwood for the treads and risers, and I now needed to cut and fit it to the actual stairway. I have internalized the mantra “measure twice, cut once”, but there is always a small residual fear as the saw blade makes its decisive cut. And the response of the material to each tool is not really embodied in the technical prescriptions for carving it to each dimension.

Maple is a hardwood. Really hard. The bandsaw, even at 5 sharp teeth per inch, feels it. The router, at 22000 RPM feels it. And to cut or shape it, the material must be fed and maneuvered at the right “rate”, or it will suffer disfigurement, chipping or burning or other undesired consequences. This requires a “feel” for the wood, which is acquired by experience. How does one develop that experience? Well, by making mistakes, of course.

After a lifetime of technology projects, I know this. One of Fred Brook’s admonitions (“The Mythical Man-Month”), was to “build one to throw away, then build the real one”. It was an acknowledgement that when embarking on a new project, we just don’t know enough to do it right. By building a prototype, we encounter the problems that come up, and learn what matters for our desired goal. After the trial run, we are then qualified to build it.

Most home projects don’t have the luxury of a building a prototype. We order the materials and install it, assuming it will “just work”. It is just too expensive otherwise.

And so I ordered the wood and when it arrived was terribly reluctant to cut it. But I had ordered an extra tread and riser anticipating that I would make a mistake. This allowed me to go ahead and make the first cut: I had a backup. Still, it requires a moment of conviction to push a $30 piece of wood through a saw along a pencil line that may or may not render it worthless.

The “measure twice” part of the mantra helped, but I still lacked the “feel” of the wood through the tool, and I would usually err on the side of caution, and the cut piece would not quite fit, requiring another pass. Still, cutting twice seemed better than cutting too far.

Eventually, the experience built, and I could cut closer to the target dimension and mostly get what was needed.

Posted in Uncategorized | Leave a comment